Instruction Of Light Inkjet Transfer Paper (warm peel)
Code: HT – 150P
Product: Light inkjet Transfer Paper
Description: with inkjet & color laser printers, a single step to make transfer for light colored fabrics.
Sizes Availability: A (8.5''X11'') - 20 Sheets, B (11''X17'')- 20 Sheets,
A4 (210mm X 297mm)-20 Sheets, A3 (297mm X 420mm)- 20Sheets, 42cm'X30M rolls
Ink Compatibility: water based Dye & pigment ink.
Ink Compatibility: water based Dye & pigment ink.
1.Application
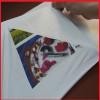
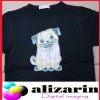
This product is recommended with wax crayons, Oil pastels, fluorescent markers, color pencil, Mild solvent ink, Eco-solvent ink, sublimation ink, Water based pigment or Dye inkjet ink for white or Light-colored T-shirts, aprons, gift bags, mouse pads, photographs on quilts etc. The transfer peels off easily after it cools or with hot and can be applied with a regular household iron or professional heat press machine.
2. Advantage
◆For many varieties,small quantity of production.
◆technology is simple, don’t need plate making, direct printing, the process short , saves time and effort
◆Designed for vivid results on white or light-colored cotton or cotton/polyester blend fabrics
◆Ideal for personalizing T-shirts, canvas bags, wool garment, aprons, gift bags, mouse pads, photographs on quilts etc.
◆Transfer peels off easily with hot (matte finish) or after cooling (glossy finish)
◆Iron on with a regular household iron & Heat Transfer Press machines
◆keeping the color and washes well, keep to washing of professional standards of textiles
◆Transfer peels off easily with hot (matte finish) or after cooling (glossy finish)
◆Iron on with a regular household iron & Heat Transfer Press machines
◆keeping the color and washes well, keep to washing of professional standards of textiles
3. Compatibility for Light inkjet Transfers
It can be printed with water based inks in most printers such as: Epson Stylus Photo 1390, R270, R230, PRO 4400, Canon PIXMA ip4300, 5300, 4200, i9950, ix5000, Pro9500, HP Desk jet 1280, HP Photos mart D7168 , HP Officejet Pro K550 etc. some of color laser printers: Epson AcuLaser CX11N, C7000, C8600, Fuji Xerox DocuPrint C525 A, C3210DX, Canon laser shot LBP5600・LBP5900・LBP5500・LBP5800, Canon CLC1100・CLC1130・CLC1160・CLC5000, CanoniRC2620・3100・3200
4. Printer Recommendations
1) Store HT-150P in its original packaging in a cool, dry place.
2) Only print onto the unprinted, coated side of transfer paper, select normal mode and mirror mode on your printer.
3) Printer settings: normal paper mode using photo quality print quality
4) Before transferring, leave the printed image to dry for approx.5 minutes, cut out the motif without leaving a margin around the edges. Straight after peel off the transfer film from the paper back.
5) First print the desired motif onto standard paper to check that the color and size are correct.
6) Compatibility: It is designed to work with water based Dye & pigment ink.
5. Iron-on Transfer Processing
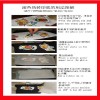
a. Printed the transfer paper first. Please use mirror image, and thencut out the motif without leaving a margin around the edges. Take the motif toward to the cotton, then transfer it.
b. Prepare a stable, heat-resistant surface suitable for ironing on.
c. Preheat the household iron to the Linen setting. Briefly iron the fabric to ensure that it is completely smooth. Do not use the steam function.
d. Iron the transfer paper, applying heavy pressure. When moving the iron, less pressure should be given. Don't forget the corners and edges.
e. Continue ironing until you have completely traced the sides of the image. This entire process should take about 60-70 seconds for an 8"x 10" image surface. Follow-up by ironing the whole image quickly, heating all of the transfer paper again for approximately 10-13 seconds.
f.After some minutes, peel the back paper off.
6. Heat press machine Transfer processing.
a. Set heat press machine at 185°C, for 15 second using high pressure.
b. Briefly heat the fabric for 5 second to ensure that it is completely smooth.
b. Briefly heat the fabric for 5 second to ensure that it is completely smooth.
c. Before transferring, leave the printed image to dry for approx.5 minutes, cut out the motif without leaving a margin around the edges.
d. Before transferring, leave the printed image to dry for approx.5 minutes, cut out the motif without leaving a margin around the edges.
e. Place transfer paper onto fabric with the printed image facing downwards.
f. heat press machine at 185°C, for 15--25 second.
g. After some minutes, peel the back paper off.
7. Washing Instructions
1) waiting 24 hours before washing for the first time(drying time)
2) Fabrics bearing our transfers are machine-washable up to 30°C, always wash garments inside out.
3) Do not use aggressive washing detergents or bleach of any kind
4) Do not tumble-dry
5) Iron only on the reverse side.
1) waiting 24 hours before washing for the first time(drying time)
2) Fabrics bearing our transfers are machine-washable up to 30°C, always wash garments inside out.
3) Do not use aggressive washing detergents or bleach of any kind
4) Do not tumble-dry
5) Iron only on the reverse side.
8. Material Storage
conditions of 35-65% Relative Humidity and at a temperature of 10-30°C.
conditions of 35-65% Relative Humidity and at a temperature of 10-30°C.


